
gnoMint
A GTK 4 Certification Authority manager
View the Project on GitHub davefx/gnoMint
- Source code
davefx/gnoMint on GitHub - Latest release
1.6.8 "Tempered Anvil" (2026-06-20) — changelog - License
GPL-3.0-or-later
gnoMint user manual
This is a task-oriented walkthrough. It assumes you have gnoMint installed — if not, see the install guide first.
The manual is divided into:
- Quick start: your first CA in 5 minutes
- Concepts — the model gnoMint operates on
- Bootstrapping your first CA
- Issuing certificates
- Wizards: web-server and email certs
- Importing a CSR and signing it
- Renewing, revoking, and CRLs
- Exporting
- Bulk operations
- Search and filter
- Comparing two certificates
- Expiry warnings
- Importing existing infrastructure
- Using the CLI
- Preferences
- Troubleshooting
Quick start: your first CA in 5 minutes
Want to be productive in five minutes? Run through this checklist; the rest of the manual goes deeper on each step.
- Install (see the install guide).
- Launch
gnomintfrom a terminal or your application menu. A default database is created at~/.local/share/gnomint/default.gnomint. - Create a root CA: Certificates → Add → Add self-signed CA.
Fill in:
- CN (e.g.
Example Root CA) - O, OU, C as you wish
- Pick ECDSA P-384 (fast + modern) or RSA 4096 (compat)
- Validity: 240 months (20 years)
- CN (e.g.
- Issue a web-server certificate: Certificates → Add Web Server Certificate (wizard) — the wizard sets all the right key-usage and EKU flags for you. Just enter the hostname.
- Export the bundle: right-click your new cert → Export full
certificate chain. You get a
fullchain.pemready for nginx / Apache / HAProxy. - (Optional) Encrypt the database: Certificates → Change Database Password, set a passphrase. From now on you’ll need it to sign anything new — but if your laptop is stolen the keys are safe.
That’s it. You have a working CA, one issued cert, and a deployable chain bundle.
Concepts
A CA database is a single SQLite file (extension .gnomint) that
holds:
- one or more certificate authorities (a root CA, optionally with intermediate CAs underneath),
- the certificates each CA has signed,
- the CSRs (certificate signing requests) you’ve imported and not yet signed,
- private keys (optionally PKCS#8-encrypted with a passphrase),
- CRL state (which certs are revoked, with timestamps and reasons),
- per-CA policy (default key length, expiration period).
You can have as many CA databases as you like — one per organisation
is typical. The default file lives at
~/.local/share/gnomint/default.gnomint; use File → Open or
File → New to switch to another.
Hierarchy
Every certificate is rooted in a self-signed CA. Intermediates are chained by signing one CA’s certificate with another CA’s key. The tree view in the main window reflects this structure: drill into a CA to see what it has signed.
Bootstrapping your first CA
- File → New (or Ctrl-N). Pick a path for your
.gnomintdatabase. -
The “New CA” dialog opens. Fill in the subject fields:
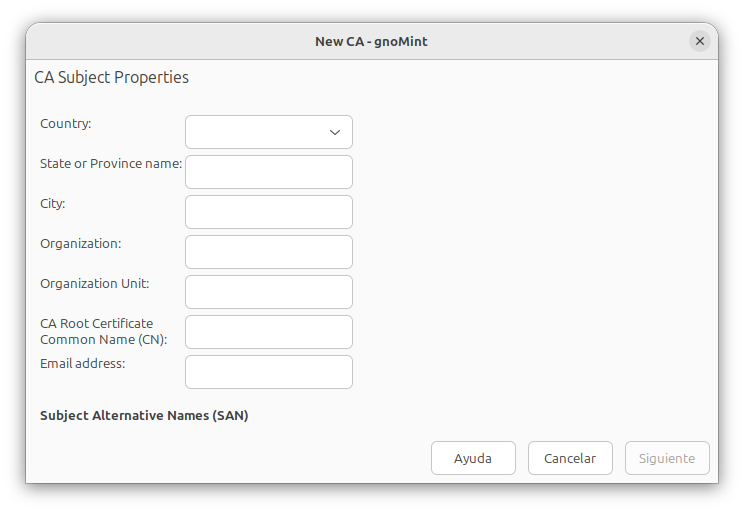
- CN (Common Name): a human-readable name (e.g. “Example Org Root CA”). This is what shows up in tools that display issuer names.
- OU / O / L / ST / C: optional organisational metadata.
- emailAddress: optional; goes into the subject DN.
-
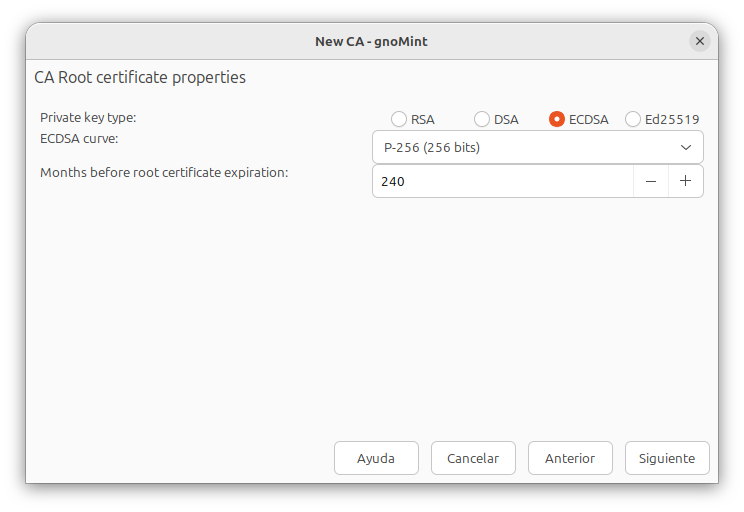
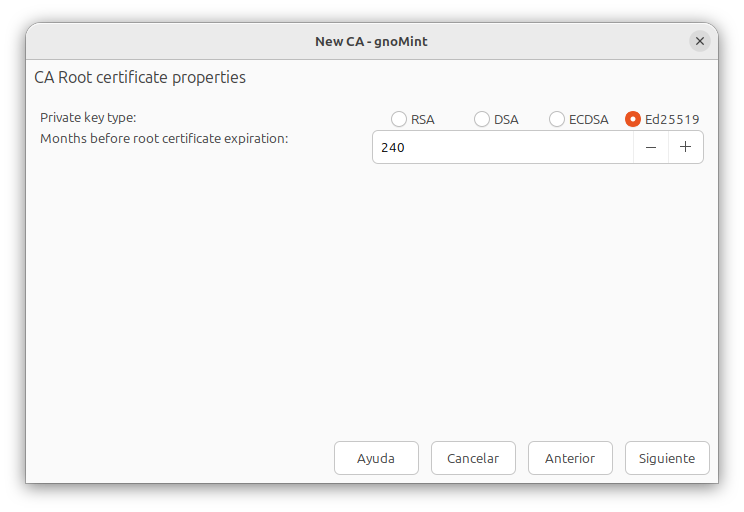
Pick a key algorithm. The bit-length / curve selector below swaps to match: a spinbutton for RSA/DSA, a P-256/P-384/P-521 dropdown for ECDSA, and nothing for Ed25519 (key size is fixed by the curve).
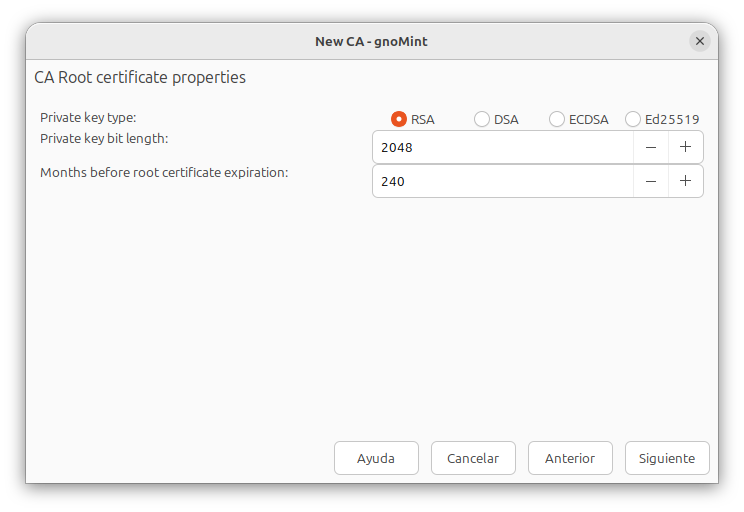
- RSA with 4096 bits is the safe default for a long-lived root.
- ECDSA P-384 is shorter, faster, and widely supported.
- Ed25519 is the smallest and fastest, but a few legacy clients don’t speak it yet.
- Choose a validity period. For a root CA, 20+ years is normal — gnoMint is Y2K38-safe, so dates past 2038 are fine.
- Optionally edit the SAN list (not common for root CAs, but useful for self-signed leaves).
- Click OK. Key generation runs in a worker thread; you’ll see a progress dialog. When it finishes, your new root CA appears in the tree.
Encrypting the database
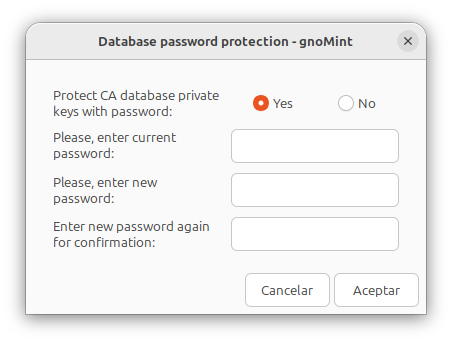
If your database holds production keys, encrypt it at creation time. gnoMint asks for an optional passphrase when you create a CA; if you set one, private keys are stored PKCS#8-encrypted with PKCS#12 3DES. You can also add/change/remove the passphrase later from File → Database password.
Issuing certificates
With a CA selected, Certificates → Add new certificate opens the issuance dialog. Fill in:
- Subject (CN/OU/O/L/ST/C/email)
- SAN entries (DNS names, IP addresses, email, URI)
- Key usage flags (digitalSignature, keyEncipherment, …)
- Extended key usage (serverAuth, clientAuth, codeSigning, …)
- Validity period (months, defaults to the per-CA policy)
- Key algorithm and length
Click OK and gnoMint generates a fresh keypair, signs the resulting certificate with the CA’s key, and writes both into the database.
Wizards: web-server and email certs
For the two most common cases gnoMint offers wizards that hide all the key-usage / EKU fiddling.
Web-server wizard
Certificates → Add web-server certificate:
- Pick the CA that should sign it.
- Enter the hostname (used both as CN and as a DNS SAN).
- Optionally enter extra SANs (e.g.
www.example.com). - Click Issue.
The wizard sets keyUsage = digitalSignature, keyEncipherment and
extendedKeyUsage = serverAuth, plus the SAN, and signs.
Email wizard
Certificates → Add email certificate:
- Pick the signing CA.
- Enter the email address (used both as CN and as an
emailSAN). - Click Issue.
Key usage and EKU are set for S/MIME (signing + key encipherment, plus
emailProtection EKU).
Importing a CSR and signing it
If a colleague hands you a CSR (.csr or .pem PKCS#10), import it:
- CSRs → Import CSR…, pick the file.
- The CSR appears under “Imported CSRs” in the tree.
- Right-click it and choose Sign.
- Pick the signing CA, choose validity, optionally tweak the SAN, click OK.
The issued certificate is filed under the CA you picked.
Renewing, revoking, and CRLs
Renewing
Right-click any non-revoked certificate and choose Renew with fresh key. gnoMint:
- Lifts the subject DN and SAN from the existing cert.
- Generates a fresh RSA-2048 keypair.
- Signs a new certificate with the same parent CA using the CA’s current policy for validity period, key usage, and EKU.
- Adds the new cert alongside the old one — the original is left in place so you can deploy + verify the new one before revoking the old one (standard “issue new, deploy, revoke old” pattern).
CLI equivalent: renewcert <cert-id>. Useful from cron — pipe a list
of expiring cert ids and let gnomint-cli reissue them on a schedule.
Revoking
Right-click any issued certificate and choose Revoke. Confirm the dialog; the cert is marked revoked, and its serial number is added to the CA’s CRL state with a revocation timestamp and reason.
Publishing a CRL
Certificates → Export CRL writes the current CRL for the selected CA in PEM or DER form. Re-export whenever you revoke something new.
Exporting
Single certificate
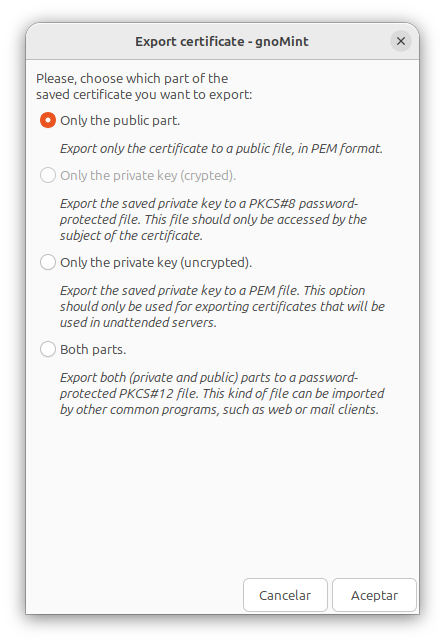
Right-click a certificate and choose Export certificate. Picks of:
- PEM (text,
-----BEGIN CERTIFICATE-----) - DER (binary)
- PKCS#12 (with the private key, passphrase-protected)
Private key
Right-click and choose Extract private key. The key is exported PKCS#8 PEM, optionally re-wrapped with a fresh passphrase.
Full certificate chain
Right-click a leaf certificate and choose Export full certificate
chain. You get a single PEM bundle in web-server order — leaf first,
intermediates next, root last — ready to drop into Apache, nginx,
HAProxy, or any other server that expects a fullchain.pem. Issue
#52.
Bulk operations
Hold Ctrl to add individual rows to the selection, or Shift to select a range. With multiple rows selected:
- Certificates → Revoke selected revokes every cert in the selection.
- CSRs → Delete selected deletes every CSR in the selection.
Mixed selections (certs + CSRs) are fine — the action that doesn’t apply to a given row silently skips it. Bulk-revoke records the same revocation reason and timestamp for every entry, so they all appear together in the CRL. Issue #54.
Search and filter
A search box sits above the tree view. Type any substring of a subject CN/DN or a serial number and the tree narrows in real-time to the matching rows. CAs are always shown so you can see which CA issued each match. Press Ctrl+F anywhere in the main window to jump into the search entry. Clear the entry (or just delete the text) to restore the full view. Issue #53.
In the CLI:
gnomint> search example.com
Matches (id    serial  subject):
3       1       www.example.com
7       3       vpn.example.com
2 matches.
Comparing two certificates
Right-click any certificate → Compare with PEM file…. Pick a
second certificate (from a .pem file you have lying around), and
gnoMint opens a side-by-side diff dialog:
| Field | Selected cert | Other cert |
|---|---|---|
| Subject CN | example.com | www.example.com |
| Serial | 7 | 12 |
| Activation | 2026-05-01 | 2027-05-22 |
| Subject Key ID | (one hash) | (different hash) |
| … |
Rows that differ are highlighted in amber, identical rows are plain. Useful for:
- Verifying a renewed cert kept the SAN list and key usage you wanted.
- Comparing your local copy of a cert against the one the server is actually serving.
- Investigating cross-signing or alternate-issuance situations.
CLI equivalent — either argument can be a DB id or a path to a PEM file:
gnomint> diff 7 /tmp/served.pem
Field                  7                     /tmp/served.pem
-----                  ----                  -----
* Subject CN           example.com           www.example.com
  Subject DN           ...                   ...
* Activation           2026-05-01 …          2027-05-22 …
…
3 fields differ.
Issue #55.
Expiry warnings
Per-row colouring
Rows in the tree view are coloured by their effective expiration:
- Amber — expires within the warning window (default 30 days)
- Red — already expired
- Grey — expired and “show expired” is on, so you can see history without misreading it
Expiry is cascade-computed: a leaf certificate is effectively expired
at the earliest of its own notAfter and every ancestor CA’s
notAfter. So a 10-year leaf issued under a CA that expires in two
months will turn amber along with the CA. Issue
#51.
Hide expired
View → Show expired certificates toggles whether expired entries (and their entire subtree, in the case of an expired CA) appear in the list. The setting is persisted in GSettings.
Importing existing infrastructure
If you already have a CA built with another tool, gnoMint can usually absorb it.
From a single PEM/DER file
File → Import file… picks up:
- A single X.509 certificate (PEM or DER).
- A single private key (PEM, encrypted or plain).
- A CSR (PKCS#10).
- A CRL.
- A PKCS#12 bundle — both cert + private key together. You’ll be prompted for the bundle’s passphrase.
Imported certificates land under the matching CA in the tree (matched by issuer SKI). Standalone certs with no matching CA in the database end up at the top level as orphans.
From an OpenSSL CA directory
File → Import directory… absorbs a full OpenSSL-style CA layout
(certs/, private/, index.txt, serial, etc.). gnoMint reads:
- The CA certificate and key (from
cacert.pem+private/cakey.pemor the path youropenssl.cnfpoints at). - Every issued cert under
certs/andnewcerts/. - The serial counter so the next issuance picks up where OpenSSL left off.
This is the recommended way to migrate a long-running OpenSSL CA into gnoMint without re-issuing every certificate.
Diffie-Hellman parameters
Certificates → Generate DH parameters… writes a PKCS#3 file for use by OpenVPN / Apache / nginx. Pick a bit length (2048 minimum, 3072 recommended); generation takes a while because finding a safe prime is genuinely slow.
CLI equivalents: importfile <path>, importdir <path>,
dhgen <bits> <path>.
Using the CLI
Everything above is also available from gnomint-cli, a readline shell
with tab completion. Common commands:
gnomint-cli                                # default DB
gnomint-cli ~/some-other.gnomint           # explicit DB

gnomint> help                              # list commands
gnomint> showcas                           # list CAs
gnomint> showcerts                         # list issued certs
gnomint> showcsrs                          # list pending CSRs

gnomint> addca                             # interactive new CA
gnomint> addservercert                     # web-server cert wizard
gnomint> addemailcert                      # email cert wizard
gnomint> sign <csr-id>                     # sign an imported CSR
gnomint> revokecert <id>                   # revoke a cert
gnomint> exportcert <id> <path.pem>
gnomint> exportchain <id> <path.pem>
gnomint> exportcrl <ca-id> <path.pem>
Same database; the GUI and CLI can be opened against the same file at different times (don’t open it from both simultaneously — SQLite locking will reject the second writer).
Preferences
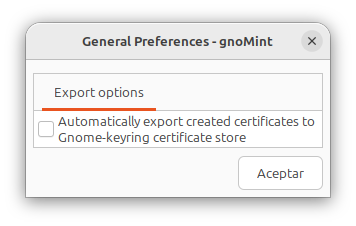
Edit → Preferences controls:
- Default key length for new RSA/DSA keys.
- Default validity period (months) for new certificates.
- Expire-warning days — how many days before a cert’s effective expiration it turns amber. Default 30.
- Show expired — same as the View-menu toggle, persisted.
All preferences live in GSettings under the
org.gnome.gnomint schema, so gsettings works too:
gsettings list-keys org.gnome.gnomint
gsettings set org.gnome.gnomint expire-warning-days 60
Troubleshooting
gnoMint won’t start / crashes immediately
- Run from a terminal to see the stderr output:
gnomint - If a previous version of the GUI files is installed, the new binary
may load mismatched
.uitemplates and trip GTK criticals. Re-runsudo make installafter every build that touchesgui/*.ui. - On Wayland sessions, force the X11 backend if you suspect a Wayland
driver issue:
GDK_BACKEND=x11 gnomint.
“Cannot find parent CA in database”
The signing path looks up the parent CA by matching the new
certificate’s Authority Key ID against existing CAs’ Subject Key
ID. Very old CAs (pre-1.0 gnoMint, or imports from tools that don’t
populate SKI) have an empty subject_key_id, so this lookup fails.
Workarounds:
- Re-issue the CA itself so it gets a SKI extension.
- Or open the database in a SQLite tool and manually set
subject_key_idon the offending CA’s row to a value matching the child’sissuer_key_id.
“Error while signing CSR” / “Cannot decrypt parent CA’s private key”
Most often this means the database is passphrase-protected and the prompt was cancelled or answered wrong. Re-try and provide the correct passphrase. If you’ve forgotten the database passphrase, there’s no recovery — that’s the point.
A renewed cert ends up in the wrong place
renewcert / Renew with fresh key inserts the new cert directly
under the same parent CA as the original. If the tree looks wrong,
verify the parent CA still has a subject_key_id populated (see the
previous troubleshooting entry).
Where do gnoMint’s files live?
| File | Path |
|---|---|
| Default database | $XDG_DATA_HOME/gnomint/default.gnomint (typically ~/.local/share/gnomint/default.gnomint) |
| Legacy DB location (auto-migrated) | ~/.gnomint/default.gnomint |
| Preferences (GSettings) | org.gnome.gnomint schema; backing file under $XDG_CONFIG_HOME/dconf/user |
| Installed UI templates | $prefix/share/gnomint/*.ui (typically /usr/local/share/gnomint/) |
| Translations | $prefix/share/locale/<lang>/LC_MESSAGES/gnomint.mo |
Running the test suite
After a ./configure && make from a source checkout:
make -C tests check
What it covers:
check_y2k38— confirms 64-bittime_tso post-2038 validity dates workcheck_ui_consistency— static check of everygui/*.uifor layout collisions, missing handlers, etc.check_workflows— runtime regression test under a headless Wayland compositor (weston). Exercises new-CA / sign / revoke / renew / expiry banner / search filter / certificate diff.check_cli_email.sh,check_cli_wizard.sh,check_cli_parity.sh— shell tests that drivegnomint-cliend-to-end and grep the output.
If make check fails, run tests/run-headless.sh tests/check_workflows
directly for the most detailed output.
Getting help
- Bug reports and feature requests: github.com/davefx/gnoMint/issues.
- Patches: pull requests welcome.
- Live docs: this site (the Markdown source is in
docs/in the repo).